Showing posts with label Formatting. Show all posts

February 19, 2014

How to format cells in Excel 2013 based on text content

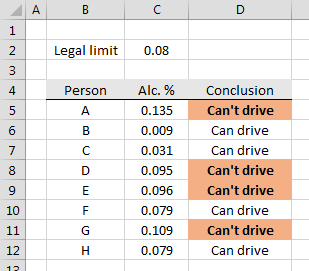
It is very easy to make cells "pop out" if they need attention. Let's take a simple example where you need to determine whether a alcohol influenced person is below the legal limit or not.


A simple IF-statement can make the text "Can't drive" or "Can drive" in the Conclusion column. However, it would be better if we could make the cells containing "Can't drive" more visible.
 
Select the cells you want to format and go to the 'Home' tab and on the 'Styles' pane you will find 'Conditional Formatting'. Select 'New Rule...'.
 
 
Then you select 'Format only cell that contain'. In this case I chose 'Specific Text' and 'containing'. You can adjust this to suit your case. Click format to change the appearance of the cell.


This is the result.

How to use auto fill in Excel 2013 without formatting

This is probably the most annoying default setting in Excel 2013 (and also all other versions) since it's rarely the case that I want to use the default setting of this one. A table often have columns which is just a function of other column. You edit the first line and want to auto fill the rest to the bottom of the table. But if the first line has a border, then this border is copied along making the table ugly.


Say I want column 4 to auto fill from 1, 2, 3, 4 and so on to the end. Drag and click and the following is your result.


It copies the top border line of my first cell. It assumes that it should repeat this pattern every third cell, which clearly isn't my intention. But if you click the little box which appears afterwards you can select the option 'Fill Without Formatting'.


And the result is the way you want it. It's cumbersome, but it works.